If you have already bought a Samsung continuum device(3.4 inch), maybe you want the maximum potential from its features. For obtaining the maximum from it, the first thing that you should do is to obtain the root access rights on your device.
The Samsung Continuum device was released 2010, November with a 3.4 inches Super AMOLED capacitive touchscreen, grid sensor protected with Corning Gorilla Glass, with 2 Gb storage internal memory and an extended microSD card up to 32 Gb, 8 Gb included. It has a 1 GHz Cortex-A8 CPU that running on the 336 MB RAM, 512 MB ROM and a PowerVR SGX540 GPU. The Primary back camera is a 5 MP with autofocus and LED flashback. The Samsung Continuum device comes by default with Android OS v2.1 (Eclair). The developers from XDA forum propose us an easy one click method to root the Samsung Continuum device, they developed a tool that you don’t need to enter commands or anything else, is one click method and the tool will make all work for you. This method is one of the simplest method that exist to root a device, only press a single button, and that’s it. To root the device firstly you need to know some things that happen when you’ve applied the root procedure:
When you’re rooting your smartphone, it will void the device’s warranty. Every time when you apply a modification on the internal file system for one smartphone the factory restrictions and the warranty are affected, there are changes to its default settings and that thing will remove the factory restrictions. Like I said the warranty will be void, but if you want to restore the device’s warranty then you need to unroot your Samsung Continuum device and the warranty will be restored.
Another aspect that you have to know is that, this how to tutorial can be performed only if you have a PC based on Windows Operating System, this tool isn’t compatible with other OS.
Now if, you know these aspects, you can move to the next section when you’ll find the How TO root the Samsung Continuum tutorial.
How to Root the Samsung Continuum device using the SuperOneClick tool.
Firstly, download the SuperOneClick from XDA forums and save it in your desktop PC.
Secondly, after the tool is fully downloaded then extract its content in one folder on your desktop.
Enable the USB debugging option on your Samsung Continuum device, to do that go to the Settings tab from your devices’ OS menu and then tap on Application option and from there choose the Development, now you can enable the USB debugging option from there.
Now, connect your Samsung device to the PC using an USB cord.
Open the extracted folder and launch the SuperOneClick application by double clicking on the executable file.
When the SuperOneClick has been launched, you’ll have to choose the Root option from its UI, so click on the Root option.
Once you click the ROOT button, the SuperOneClick tool immediately will start the rooting process for your Samsung Continuum smartphone.
Now, all you need to do is to wait until the tool will root the smartphone, this process need a few minutes to be completed, so wait patiently for it to finish.
When the rooting process is done, reboot your Samsung Continuum device.
That’s all, now you have a rooted device. For checking that the device was successfully rooted or not, you have to go on the App Drawer and search the Superuser app. This app confirms the root access.
With a rooted smartphone, you can unlock the device’s bootloader, installing the root only applications, installing the custom ROMs that are available for your model device, installing the Recovery Images, and to do all the customizations that you like.
For any extra questions, or if you’re in the face of some issues you can use our comment section to post your comments.
Top Best Custom ROM for the Samsung Galaxy Tab 2 10.1
Galaxy Tab 2 10.1 is the big screen version of latest Samsung Galaxy Tab 2 Android Tablet range. It features latest hardware and Android ICS. We have already told you how to root Tab 2 10.1 easily and install CWM recovery in our previous tutorial. Now, as promised we have reviewed all the custom ROM available and bought up a list of best Custom ROM for Galaxy Tab 2 10.1. These ROM have different features and qualities.
Android 4.1 Jelly Bean is out and every Galaxy Tab 2 owner is searching for Jelly Bean update or Custom ROM . Let me tell you that right now Samsung has no clear Official plans to update Galaxy Tab 2 with latest Android Jelly Bean OS. The Official Firmware update will be released only after Galaxy Note 10.1 will be launched with Jelly Bean. You can get either a Ported firmware or CyanogenMod 10 Jelly Bean custom ROM. Cm10 has already created hopes for a dozen of tabletmodels to get the latest Android Jelly Bean taste but it would take some time for developers to develop a stable working Jelly Bean build for Galaxy Tab 2. Latest updates says that Developers have already introduced a working Jelly Bean ROM for Galaxy Tab 10.1 but Galaxy tab 2 needs to wait some more time.
Warning: Neither we nor the developer would be liable if in the process of following the below mentioned article you damage your phone. You should also know that rooting of your device will void its warranty.
CyanogenMod9 ROM forSamsung Galaxy Tab 2 10.1: CyanogenMod ROM is the best custom ROM for Android devices. It is based on the Android open source project with contributions from many people within the Android community. This ROM can be used without any need to have any Google application installed. Other features are: smdk4x12: lights: battery LED support, Revert “Remove message notification while in conversation UI”, unpacking: need to also update the written file, unpacking: apparently mkbooting no longer accepts hex values, echo args, unpacking: fix magic search and much more. Visit the link below to download and know about this ROM.
Infected ROM v1 for Samsung Galaxy Tab 2 10.1: Infected ROM is based on 4.0.3 and is fully De-odexed and Zip-Aligned. Features of this ROM are: Init.d Support/Scripts( Requires Kernel Support First), USB Charging, Auto Zipalign at Every Boot, Xoom Browser, Hardware Accelerated Launcher2, Pre-Rooted, Google Music App, No Ads-Host, Roboto Font from ICS, ICS Media Added, Build.prop Tweaks, Maaxthon Browser, Added Sqlite3, Removed Sammy’s Bloatware and other awesome features.Download this ROM from the link below and also satisfy all other queries.
Fry ROM for Samsung Galaxy Tab 2 10.1: Fry ROM is rooted, De-odexed and CM9 imported. Other important features include: Busybox added, Removed ads, support for “nano”, “sysrw”and “sysro” built into ramdisk, Removed most of Samsung’s bloatware, Removed Samsung Keyboard, Removed TouchWiz Launcher, Removed Hubs, Removed Mini-apps, Removed S Planner (calendar), Removed Screencapture button, Replaced Gallery, Added AdAway to remove ads, Added custom bootimage support, ADB at boot time support and lot more. Visit he link below to download this ROM and satisfy all other queries in its context.
Clean ROM v1.1 for Samsung Galaxy Tab 2 10.1: Clean ROM is Stock, Rooted, De-odexed and Zip-aligned. It has enumerable features some of which are: a bunch of bloat applications removed, crap bookmarks removed, Moved Dropbox to data so it can be removed, removed SuperSU and added Superuser to resolve some issues, Added download containing removed apk files. It has other interesting features to know them and download this ROM visit the link provided below.
Share your thought with us after you have installed any of the above listed custom ROM for yourSamsung Galaxy Tab 2 10.1. We will also try to find solution for your queries if you have any.
Update: Developers have recently released the CM10 Android 4.1.1 Jelly Bean for Samsung Galaxy Tab 2 10.1 and this one has lot less bugs and stable. This is a great effort and we can expect some better more stable ROMs arriving for Samsung Galaxy Tab 2 10.1.
If you're a Samsung Galaxy S2 owner then you may have already received an update for your handset, which brings it bang up to date withAndroid 4.0 -- also known as Ice Cream Sandwich (ICS). If you feel that ICS doesn't offer enough to excite you, you could try one of the raft of custom ROMs available for the S2 instead.
The latest iteration of Google's all-singing, all-dancing mobile OS, ICS brings myriad improvements, including superior multi-tasking, better data management and the ability to unlock your phone using your face. Custom ROMs, on the other hand, are unique versions of the operating system created by the many passionate and talented coders working within the Android community to bring benefits beyond the official OS.
It might sound scary, but it's no different from when a handset manufacturer or network operator creates their own Android skin. They take the core Android OS and tinker with the look, feel and functionality, thus creating an original experience. In fact, one of the big benefits is that these ROMs strip out all of the extraneous rubbish -- unnecessary apps and 'bloatware' -- that is often bundled with branded versions of Android. This can result in much faster performance.
I've picked out a couple of the very best custom ROMs doing the rounds. To install these, you'll need to have rooted your phone first. Thankfully, we've got a guide for that too. We also have a guide for how to install ROMs on your phone, so be sure to familiarise yourself with it before going any further.
It's also worth checking out the excellent ClockworkMod ROM Manager app, which is available for free at Google Play. This makes the process of installing custom ROMs much easier. It allows you to back-up your existing ROM should you wish to revert back. If you upgrade to the premium version of the app, it will even let you perform over-the-air updates for supported ROMs, just like officially sanctioned software.
It goes without saying that this level of tinkering is only for those of you who are 100 per cent confident of your hacking abilities. Messing with your phone's firmware instantly invalidates your warranty, so make sure you're wearing your special 'brave' trousers before installing any of the ROMs listed below.
Also be aware that unlike Google and Samsung, the developers behind these custom systems don't have millions of quid and a workforce of thousands. There will be quirks with the software and you'll need to be patient in waiting for them to be rectified.
CyanogenMod 7
Easily one of the most popular custom Android ROMs and one of the few to receive positive recognition from handset manufacturers and network providers alike, CyanogenMod has been around since 2009 and currently supports around 60 devices.
The team behind the ROM is committed to producing the most stable and reliable firmware for your Android device. A whole host of cool tweaks and enhancements are packed in -- the vast majority of which have been influenced by feedback from the 1.7 million users who have downloaded and installed this custom ROM. The music player is a particular highlight -- so much so that it's been released as a standalone download for rooted phones that aren't running CyanogenMod.
Security is another thing the guys behind CyanogenMod take very seriously, and that's why the ROM includes the ability to revoke individual permissions for applications. You can also filter outbound calls and SMS messages using 'Phone Goggles', or 'drunk mode', as many people have called it. This feature could prove indispensable to those of you who regularly make prank calls or send provocative texts while under the influence of alcohol...
Created by Chinese firm Xiaomi Tech, MIUI is arguably one of the best-looking custom Android ROMs available. It's also one of the most radically different. MIUI drastically alters the way your phone's user interface looks and many people have compared it to Apple's iOS.
The most significant difference is the complete removal of the Android applications drawer, which makes the whole user experience feel much more iOS-like. Another bonus is the inclusion of support for themes, of which there are well over 100 community-created variants now available (although with the recently ported MIUI 4, themes aren't currently supported on the Galaxy S2, so you may wish to try an earlier version).
Like CyanogenMod 7, MIUI is based on Android 2.3 Gingerbread, although experimental versions of the OS have been released that are built on the Android 4.0 framework. These are still very much in the testing phase, so don't expect them to perform 100 per cent smoothly.
While mods such as CyanogenMod and MIUI have taken their time getting up to speed with the Android 4.0 source code, some of the smaller modding teams have stolen the march, producing new custom ROMs that offer subtle visual changes over stock Android, but considerable performance improvements underneath.
Resurrection Remix Pro looks very much like the bog-standard stock Ice Cream Sandwich interface, but additional options include toggle settings in your drop-down menu bar (like HTC Sense prior to version 4). It also strips away all the unnecessary rubbish that manufacturers and networks insist on installing on your handset, and this increases speed and overall performance.
If you're happy with Ice Cream Sandwich but are looking to gain a little additional power, this is a good bet.
This is another ROM from a small development team. One man, in fact. Even though it has been coded in someone's bedroom, SensatioN ROM looks absolutely stunning, boasting subtle yet classy enhancements over the existing Galaxy S2 user interface.
Based on ICS 4.0.3 -- which is just one version behind the latest 4.0.4 -- SensatioN ROM is undergoing constant design changes that should result in a package that's even more visually appealing than the current edition. Although it's not quite as well known as CyanogenMod and MIUI, this is worth keeping an eye on.
Another Ice Cream Sandwich ROM that looks mighty similar to the stock experience, Foxhoundoffers some hidden benefits. The most obvious is overclocking, which allows you to boost the performance of your phone by dialling up the speed of the processor. This is fun for experimentation, but it also results in reduced battery life and random crashes, so you're unlikely to rely on it too much.
More appealing is the fact that Foxhound is quite a stable ROM and offers speed improvements that put the Galaxy Nexus to shame. Firing up the camera feels much quicker and the phone seems to respond really well to general commands. If you don't resort to overclocking, you'll also notice that battery stamina is improved over the official Galaxy S2 OS.
Another bonus is that you get a cool boot sequence inspired by Konami's Metal Gear Solidseries of videogames -- from which this ROM also takes its name.
Samsung Galaxy Ace S5830i isn’t as spectacular a phone as its name suggests, but it is a competent budget smartphone. The little monster has a 3.5 inch 320 x 480 pixel display, a 800 MHz processor, a 5.0 MP 2592 x 1944 pixels rear camera with auto-focus and LED flash, WiFi, and 1350 mAh Li-Ion battery. The phone was released in March 2011 with Android 2.2 Froyo which has now been updated to Android 2.3.6 Gingerbread.
If you have this phone and are looking for an Ice Cream Sandwich or Jelly Bean update from Samsung, you are simply beating about the bush. That is not to say that there is no chances of enjoying ICS or Jelly Bean on your Samsung Galaxy Ace S5830i. Remember it the awesome world of Android where impossible is nothing and nothing is impossible. It is another thing that being a low-end smartphone, all Galaxy Ace phones have not got due attention from our developers. Still there is not a complete void if we talk about a custom ROM for the Galaxy Ace S5830i.
Please note that before being able to installa custom ROM on your Samsung Galaxy Ace S5830i, you will have to root your phone. Moreover, it must haveClockworkMod Recovery installedon it. If you already have a rooted phone, you can directly jump to the custom ROMs section. In case you have rooted and installed CWM Recovery on your Ace S5830i, head over to our handy tutorial by clicking on the link below.
Before you actually proceed to install custom ROM on you Galaxy Ace 5830i, let me warn you that it is a risky procedure. Do not move ahead unless you are fully aware of what you are going to do. The method and ROMs listed below have been tested by thousands of people successfully but if you are not duly careful through the procedure, your case might be an exception. Neither Droidviews nor the developers of the ROMs will, at any rate, be responsible for any mishap. Being a owner of your phone, you know better what is god for you.
How to Install a Custom ROM on Galaxy Ace S5830i:
Making Preparations:
Well, if you ready to flash a custom ROM on your Galaxy Ace 5830i, you need to do a few things before proceeding to flash the ROM. Among the other things you need to do before installingthis ROM are:
Turn on the USB Debugging mode on your device. Go to Settings> Applications>Development> USB Debugging> check the box.
Download the ROM you like from the links below. Do not extract the zip fileand copy it to the main directory of your device’s SD Card (not in a sub-folder).
Download Google Apps for your phone from below (do not extract) and copy it to the same location as the ROM file.
IMPORTANT: Download a Root File Manager app from the Google Play Store. Open the root file explorer and look for a folder called “efs” and backup the this folder to the External SD card of your phone. It will be even better if you backup this folder on your computer too. In fact, this folder contains your phone’s IMEI. In case you discover that your phones IMEI number has gone/lost, you can restore the “efs” folder back to its place and your problem will be fixed.
Installing a ROM on Galaxy Ace:
First of all make sure that you have done all things mentioned above under preparations.
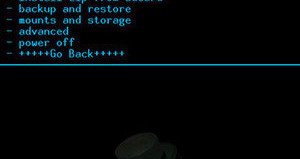
Turn off your device and boot it into CWM Recovery Mode. Press and hold the Volume Up + Home keys and then long ress the Power key till the start up screen with “Samsung Galaxy Ace GT-S5830i″ logo blinks for two times and you see a screen as shown below. Another way to boot the device into ClockworkMod to download the ROM Manager app from the Google Play Store and use “Reboot into Recovery” option.
In the Recovery Mode, use Volume, Home and Power keys to navigate between the options and select them.
Open “backup and restore” and backup your current ROM (important). When the backup is done go back to the main menu
In the CWM Recovery Mode, scroll to “wipe data factory reset” option and select “Yes”.
Go to Advanced option and “wipe dalvik cache”.
Then come back to the main menu and select “install zip from sdcard> choose zip from sdcard”. Now browse to the ROM file and select it. Confirm your choice by selecting “yes”.
This will start the installation process and will take a few minutes to complete.
When it is done, go back and install the GApps using Step 8.
Return to the main menu again and select “reboot system now”. It might take a few minutes before your device reboots, so a little patience is required.
When the phone boots up, you will be able to enjoy the newly installed Jelly Bean ROM on your Galaxy Ace S5830i.
Download Google Apps Apk
Download the following Google apps, copy them to your phone by connecting phone to computer using USB cable and install them.
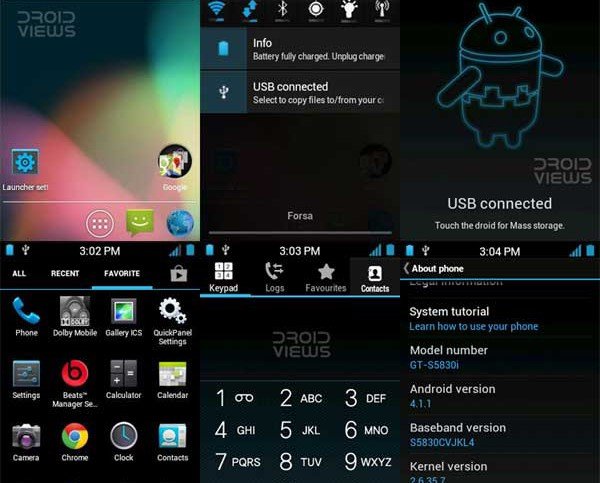
The Jelly Blast ROM for the Galaxy Ace S5830i is one of the best choices out there if you want to upgrade your phone to thelatest version of Android Jelly Bean. The ROM is based on CyanogenMod 10 and lets you enjoy Android 4.1.1 Jelly Bean with all new features. The ROM is a port from the Jelly Blast ROM for the Galaxy Y. The Galaxy Ace version is very fast and smooth. Needless to say it is a battery-friendly ROM. If your mind is stuffed with Jelly Bean, go for it and it would not disappoint you. Being based on CM, the ROM also supports themes which can be downloaded from the Play Store.
How to Fix JellyBlast Headset Bug:
After installing this ROM, if you get problems with audio or earphone not detecting issue, download and install theSoundAbout app from the Play Store. Open the app, search audio media and check the Wired Headset (with Mic) option. Connect your earphone to phone. To go back to the normal mode change it to “Let the Phone Decide” option.
How to install: Go to the beginning of the post for installation instructions. Please flash this ROM on on your phone after updating your phone to the latest version of stock firmware, otherwise you might face camera and headphone issues.
Watch JellyBlast ROM for Galaxy Ace S5830i in action:
Do you own a Samsung Galaxy Ace S5830i and are crazy about iPhone, you can enjoy the look and feel of the iOS on your very Ace S5830i with the Simplicity V3 Final ROM for your phone. The ROM does not only lets you enjoy the iOS look on your Ace, but it also comeS with Xperia Arc and Xperia S themes that completely revamp the look of your Galaxy Ace S5830i.
I would like to recommend this theme for your phone not only for its theming capabilities, but also for its smooth performance and features. The only known bugs of the ROM are Kies and Camera not working. The Camera bug, however, can be fixed by installing the camera app (download below). Copy the Camera.apk to your device’s SD Card and install it from File Manager.
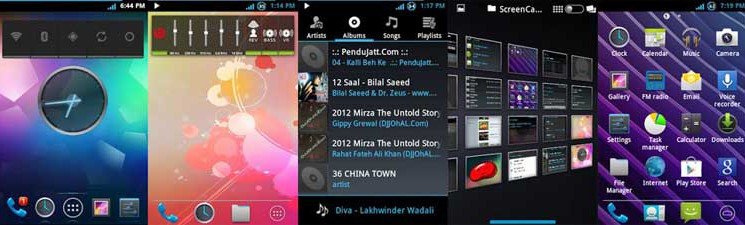
Enjoy the look and feel of the Samsung Galaxy S3 on your very Galaxy Ace S58230i by dressing up your phone with the MindCr SGS3 styled Rom. It is a feature packed ROM that ports most of the Galaxy S3 UI design. The ROM is fast, smooth and battery-friendly as well. The ROM is based on Android 2.3.6 Gingerbread. To know what features it brings to your phone, just throw your eyes below.
Quickpanel and ROM settings support language: English, Spanish, Italian and Polish
How to Install:
If you are going to install this ROM over a another custom ROM, follow the guide given the beginning. In case, you are to flash it over a stock ROM, follow the following steps:
Copy the ROM file.zip, ClockWorkRec.zip and Flash Player.zip files in the root (main) directory of your SD Card.
Turn off the phone and boot it into Recovery Mode by pressing: Volume up + home + power. (To navigate the menu use the volume keys, to select the home, and back to return).
Go to “apply update from sdcard” and choose ClockworkRec.zip
Then wipe data / reset – YES
Go to “advanced>Wipe Dalvik Cache>yes
Return to main menu
Go to “mounts and storage> format /system> yes”
mount /system (it change to unmount) – Press Back
Select “install zip from sd” / “choose zip from sd card”
Select ROM file and confirm
When the installation is finished, go back to main menu and reboot phone.
Enjoy the Galaxy S3 styled ROM on your Galaxy Ace S5830i!